
Processing Lunar AVI's Using RegiStax 5
(by Bob Pilz)Optimize Tab
R5 provides significant optimizer performance
and quality enhancements (figure 7):
· Prior to R5, optimization would read all frames
in the AVI for each AP.
Now as each frame is read, optimization is done for all APs applicable
to that
frame. This significantly reduces the time and number of hard drive
accesses
required. It is still possible to specify the R4 optimizer, but I have
found no
reason to do so.
· R4 had an option for a single run optimization;
however, I found I
occasionally got better results leaving it unchecked so as to use
multi-pass
optimization. In R5 Fast Optimizer is
the default and usually results in a single optimizer pass (although
multiple
passes may still occur if sufficient changes in the quality of
optimization occur
in each pass). For my AVIs I now find that a single pass by the
optimizer is
what usually occurs and without any penalty in quality. This
significantly speeds
up the process compared to multi-pass.
· R5 provides two optimization algorithms. The
default, Squared, is the algorithm
used in prior
Registax versions. I have not seen a significant difference pro or con
to using
the new algorithm, Absolute, so I
use
the default.
· The most significant quality improvement has
been in the Create Reference function.
In prior
releases it would create a reference frame based solely on the quality
of AP1. In
less than ideal seeing (i.e. all the timeJ) this would result in a
reference frame sharp at AP1 and increasingly less so the further away.
In R5
the best frames at each AP will be used to create the reference frame.
This
helps ensure the quality of the reference frame is uniform which helps
subsequent optimization, and, I believe, reduces the chance for seams.
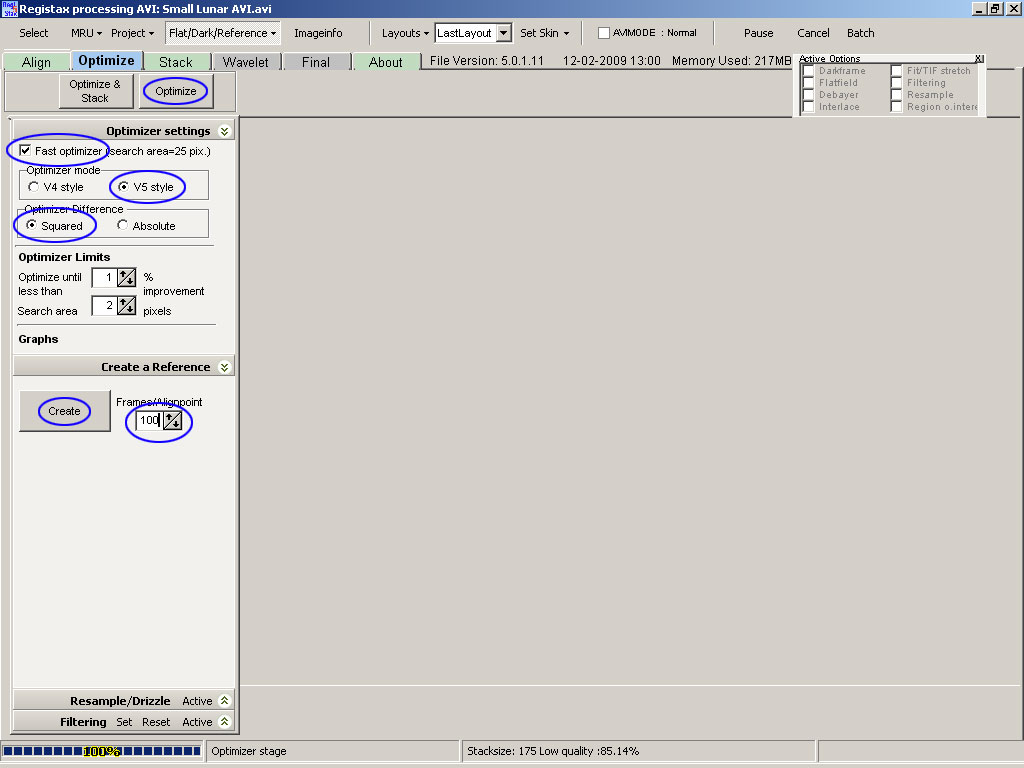
Figure 7.
Create
Reference
At this point, we have the option of creating an improved reference frame prior to full optimization. I’ve found this to be essential. My process is as follows:
· Under Create a Reference, I set the Frames/Alignpoint to 100. I want a sufficient quantity of frames so that I can sharpen them later in this process without being overly concerned with noise.
· Click on Create. The create reference process then optimizes these 100 frames (i.e. the 100 best frames at each AP!) and brings up the wavelet screen. This allows the image to be sharpened before it is used in the subsequent optimization step. I like to apply a modest amount of sharpening but not enough to make noise apparent. Typically the parameters I would use under Wavelet Settings would be:
o Check Default under Wavelet filter
o Change the Layer 1:1 slider to 12
· Click on Continue. This will take us back to the optimizer screen.
Optimize
Click on Optimize. There is an Optimize & Stack option which I do not recommend. As we will see in the next section, there are a several things that should be done at the stacking screen. Clicking on Optimize & Stack would bypass the stack screen and go directly to the wavelet screen. After optimize completes, it is a good idea to save the results just like we did after align. Click on Project and then click on Save Default. Finally, click on the Stack tab to go to the next stage of processing.