Processing Lunar AVI's Using RegiStax 5
(by Bob Pilz)Align Tab
General Settings
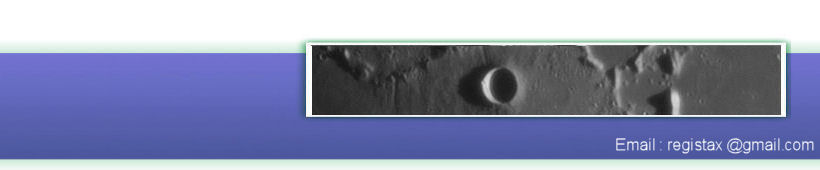
There are several values that I change from the defaults to eliminate various messages during processing (figure 1):
· Check Ignore Misaligned Frames under Tracking Settings
· Under Processing Area, I set the Size to 1024 and click on Hold Settings. This ensures that later in wavelet processing the entire frame gets changed without any messages popping up. If I had a camera with a larger frame size than 1024x768, I’d set the value to 2048. Be aware though that settings these values causes Registax to reserve considerably more real storage during processing.
· Uncheck Messages During Optimizing under Additional Settings (see Options tab, vertically at left)
· Uncheck Messages During Create-reference under Additional Settings (see Options tab, vertically at left)
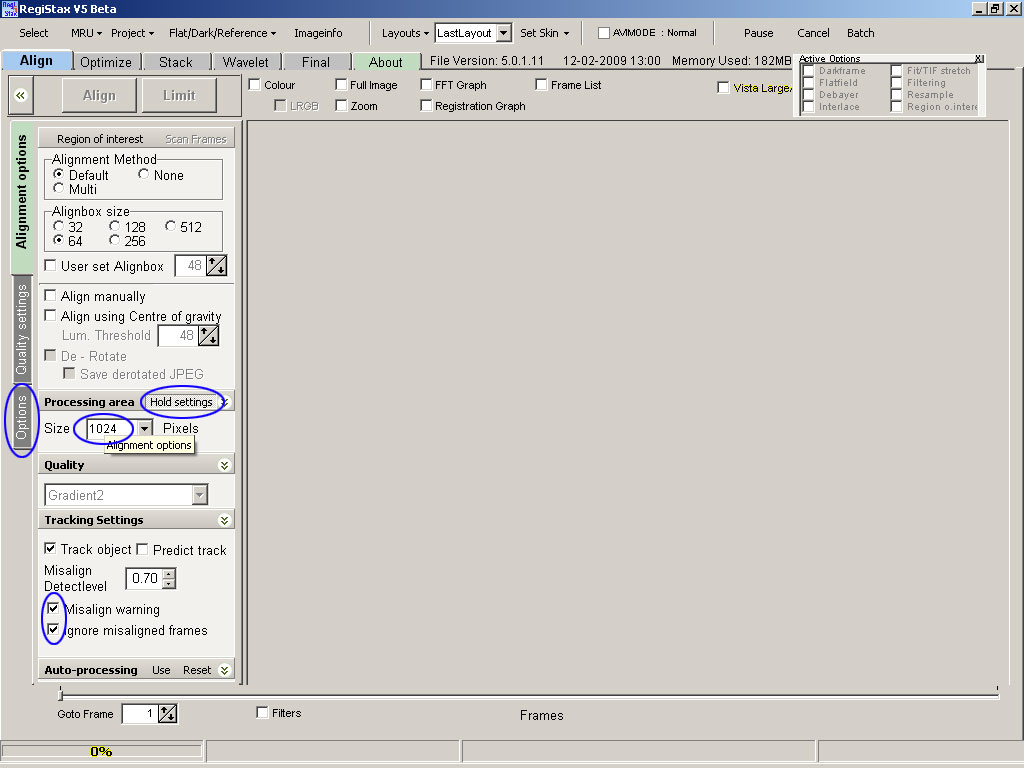
Figure 1.
Selection
Click on SELECT (figure 2) in the menu to open the usual windows dialog box. Here I’m opening a small 200 frame AVI from the desktop which I’ll be using throughout. Incidentally, you may wonder why the file size is as small as shown (about 19mb vs 180mb for the uncompressed version of it). I record my AVIs using a LEAD MCMP/MJPG CODEC to compress the files (google it for details). This allows me to record many more frames before running into Registax and/or windows constraints. I use the MCMP CODEC options that apply minimal compression, and in my experience any change in quality due to the compression (very, very minimal) is more than compensated for by the ability to record more frames which leads to more chances for good ones.
Files greater than 1GB can now be opened. I have used files up to 3.8GB with no problem. This is particularly beneficial for large chip size cameras. AVIs can now also have more than 10,000 frames (up to 50,000 supported). I am a big believer in recording lots of frames in order to maximize the chance of getting enough really good ones. Recently I’ve been experimenting with up to 20,000 frames with excellent results. Interestingly, one might think that lots of frames only make a difference when seeing isn’t that good. However, I’ve found that even when the seeing is quite good, recording more frames and having a larger pool to choose from still makes a useful difference in the amount of detail that can be extracted from the AVI.
Figure 2.
Create an Initial Reference
Frame
The first step in doing align processing has typically been to choose the best (i.e. sharpest) overall frame in the AVI by moving the slider at the bottom of the screen until the best one is found. This “initial frame” is then used as a reference in determining quality and initial alignment. A better way now exists in R5. Under Flat/Dark/Reference in the menu, you can load a reference frame (Load Referenceframe). This frame needs to have exactly the same pixel dimensions as the frames in the AVI. When this reference frame is loaded, it occupies the first frame number and can be used to position align boxes, but during the actual align processing it is only used as a reference.
Of course this begs the question of how one creates such a reference frame. Doing so involves essentially the same steps as the overall processing of an AVI with some abbreviation. To avoid getting into the full details at this point, I’ll just list the steps I currently do to create this initial reference frame. If you are new to Registax, it will only make sense if you come back after reading the rest of the article.
1. Align Screen (Figure 3)
a. Choose the overall best frame using the frame slider at the bottom of the screen
b. Click on Multi under Alignment Method
c. Click on 128 under Alignbox Size. I use this size rather than a smaller more “accurate” 64 pixel align box, because my intent is to form an overall good image rather than the best at any particular small area. On 1024x768 AVIs I have even used 256 pixel align boxes.
d. Generally I will place the first align point (hereafter referred to as “APx” where “x” is the align point number) near the middle of the frame and place one in each corner (though, of course, not so close to the frame edges that you risk having it drift outside as Registax cycles through all the frames during align processing). Sometimes I use more than five especially with a larger pixel AVI.
e. Align and Limit to 50 frames.
2. Optimize Screen
a. Create Reference with these 50 frames. I generally use a small amount of sharpening for this reference. In wavelets, Default with the Level 1 slider set to 8 is typical. Click on Continue.
b. Click on Optimize
c. Click on the Stack tab
3. Stack Screen
a. Under Options, click on Show Stackgraph
b. Use the slider under the top graph to limit the number of frames stacked to 10. My intent here is to have a compromise between using the very best frames at each AP as a reference while still stacking some frames together to smooth out the worst of any noise in the individual frames. Exactly what is the best number needs more study, but 10 has been working well for me.
c. Click on Save Image and save in the same folder as the original AVI. NOTE: This saves an unsharpened stack of frames. So far I haven’t seen an advantage to using an initial reference frame that has been sharpened. However, more study is needed to pin this down.
Not only does the above process produce a cleaner (from a noise perspective) and relatively sharp frame, but one that is geometrically more average than any individual one selected from the AVI. I believe this pays dividends in minimizing seams later in stacking. I have had much less problem with seams using R5 than I did with R4.
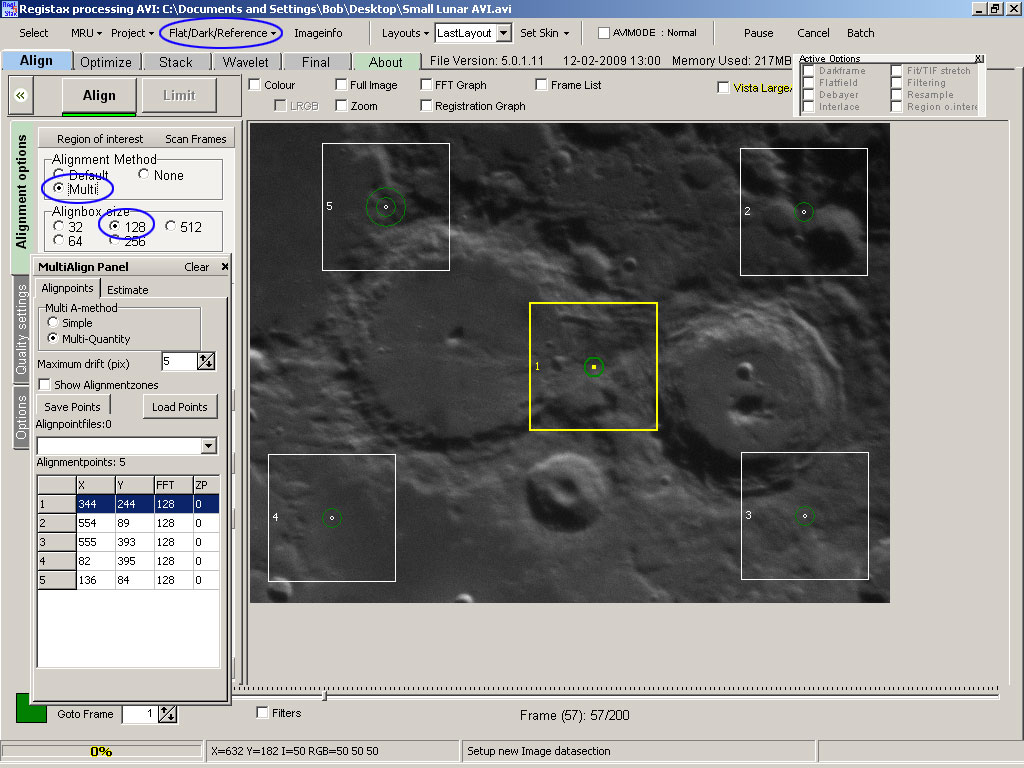
Figure 3.
Load Reference Frame
In the menu click on Flat/Dark/Reference and then Load Referenceframe and in the dialog box specify the reference frame that was created in the prior step.
Scan Frames
In a following step we will be specifying APs
and quality assessment
box sizes. It is desirable to place these APs and boxes as close to the
edges
as possible to help ensure that the final image is uniformly sharp. The
difficulty that arises is that the image drifts around due to tracking
errors
and seeing. Especially in prior versions, having an align box drift
part way
off the frame caused a lot of problems.
R5 provides a way to eliminate this difficulty
all together. Position
the slider at the bottom of the screen at frame 1 (which is our
reference frame
that we loaded in the step above). Place a single 64x64 align box on a
distinct
high contrast feature anywhere in the image (away from the edges of
course) and
click on Scan Frames (at top
left).
After completion (figure 4), a white rectangle appears on the image. This rectangle represents the part of the image that is visible in every frame. As long as we place the edges of align boxes within this area, we need not worry about them drifting off the screen. In addition to a nice usability improvement I consider this an image quality enhancement, because now align boxes can be positioned as close to the edges as possible resulting in sharpness closer to the edges.
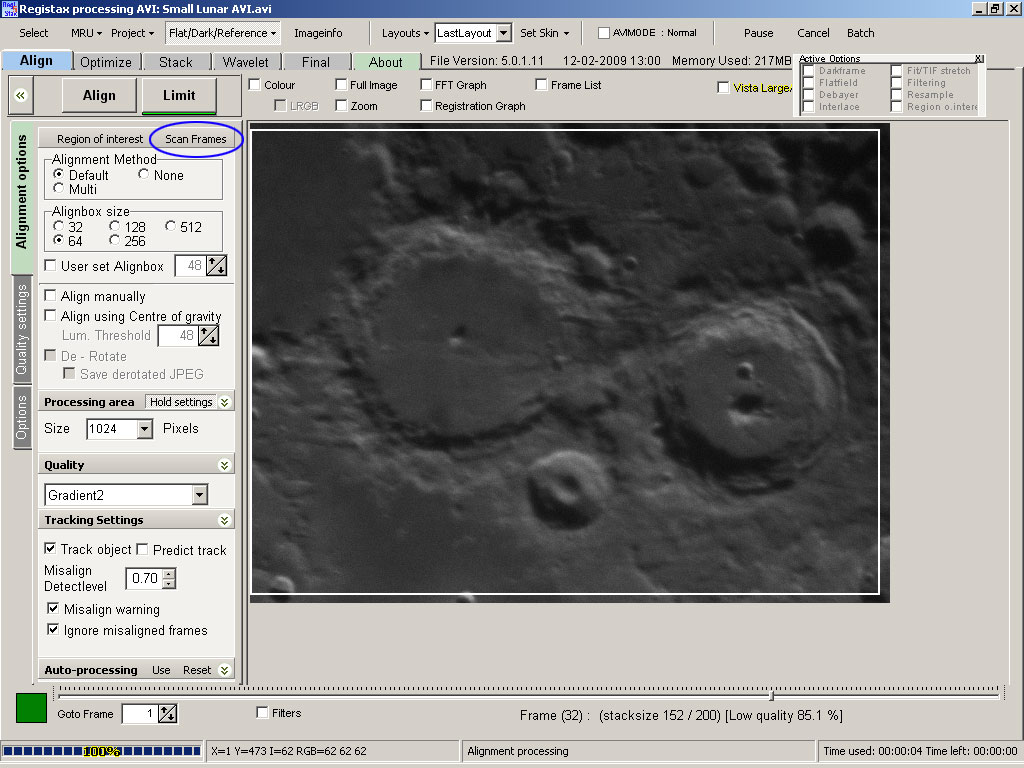
Figure 4.
Filters
There are several new filters in R5. One that I’ve started to use occasionally is Stretch. At the bottom of the screen check Filters, then check Stretch. Usually I record an AVI with a maximum histogram reading of 200-225. I do this to avoid max’ing out any pixels during recording or later in post-processing. Using the stretch filter, I can lower the white point from the default 255 to something less such as 240. This will brighten the overall image, especially the darker areas, and, potentially allow Registax to do a better job of quality assessment and aligning. Sometimes raising the black point can be useful for AVIs where the lowest pixel value is above 0. I feel I need to do more testing to nail down the actual benefit of this, but other testers have found it useful. One caveat, it takes additional CPU resources to do the filter for every frame which slows down processing. These filters only are in effect for alignment and optimization and don’t affect the final stacked image.
Specify Align Points/Align Boxes
A major change has occurred in this area which I’ve found can significantly improve the quality of the processed image. R5 provides the ability to specify align box sizes that are not a multiple of 32. R5 also increases the maximum number of APs from 200 to 500.
To appreciate the potential benefit a small digression on seeing is needed. My seeing generally has two main components: 1) blur and 2) distortion. Taking a lot of frames combined with Registax’s quality assessment algorithm helps minimize the effects of blur by choosing the sharpest frames. However, within an align box, parts can be distorted in one direction on one frame relative to other parts and in a different direction on another frame, yet to Registax they both might seem to have equal quality from a sharpness perspective. If subsequently they are both selected to be stacked together, the resulting stack would be of lower sharpness than each individual image.
Generally a 64x64 pixel align box size is the smallest that allows for a good quality assessment. Yet I generally have some level of distortion even within that size. R5 addresses this problem by allowing the size of the alignment area to be smaller than the size of the area used for quality assessment. For example, a user can specify a 48x48 pixel align box and R5 will still use a 64x64 pixel area for quality assessment. Alignment and stacking use the 48x48 pixel size to form the final image. Placing these 48x48 align boxes next to each other allows R5 to do a better job of accounting for any distortion.
Using R4, I always set all the APs manually.
Although there was a
method for generating APs automatically, I felt I could do a better job
myself.
R5 has significantly improved the automatic generation of APs such that
I
routinely use it (especially since the ability to specify smaller align
boxes
means there are usually a whole lot more APs to specifyJ). There are a lot of knobs to
turn in setting APs which you can experiment with. My usual process is
as
follows (Figure 5):
· Check 64 under
Alignbox size
· Check Multi under
Alignment Method
· In the multi-dialog box:
o Click on Alignpoints
§ Set Maximum drift
(pix) to 5. This is a
deceptively small appearing
change in R5 which actually is a tremendous aid in processing. In
effect it
says if APx shifts more than (in this example) 5 pixels compared to the
shift
that occurs for AP1, then APx is given the same shift as AP1. This only
holds
for this stage of alignment and will be properly refined in the
optimize step.
This makes a great difference in Registax’s ability to track APs in bad
frames
or bad seeing. It totally prevents those drifting align boxes we used
to see in
previous versions from time to time. I find a value of 5 works well for
my AVIs,
although more study is needed to determine if a smaller value would be
better.
o Click on Estimate
§ Check Method 2 (seems
to do
a better job of covering all areas with APs than Method
1)
§ Click on Set_Master
Alignpoint.
This allows the user to position/identify AP1 so that subsequent
automatic
generation of APs will not encroach upon it. I try to choose a
contrasty,
well-defined area near the middle of the frame.
· Check User Set
Alignbox and
set the value to 48. What this does
is let the quality assessment area continue to be 64x64 pixels but the
alignment area within will be 48x48 pixels. If you move the cursor over
the
image at this point you will see a box within a box. The outer
represents the
quality assessment area and the inner the alignment area. More study is
needed
to determine whether a somewhat smaller value would be even better.
· In the multi-dialog box:
o The values for Threshold,
Detectionlimit and Radius
I
leave at the default (an area for future study)
o For Minimum distance
between
points (pix) I set a value of 32. This seems to produce a
good density of
48 pixel align boxes with some partial overlap.
o Free space to edge specifies how close
to the edge of the frame the quality assessment boxes can be placed.
Since we
did a Scan Frames earlier we have
a
white rectangle on each frame showing the limits. The Free
space to edge takes this into account. I generally specify a
limit of 2 pixels just to make sure the quality assessment box doesn’t
drift
off the common area anywhere during processing.
o Click on Estimate
Alignpoints.
After a few seconds the align boxes will appear. If too few I might
decrease
the Minimum distance between points
(pix) or increase it if too many.
o I will use the mouse to add additional APs if
there are areas not
sufficiently covered by the automatic placement.
CAVEAT: The above works well for my AVIs taken in good or better seeing. Worse seeing might not yield good results with 48 pixel align boxes.
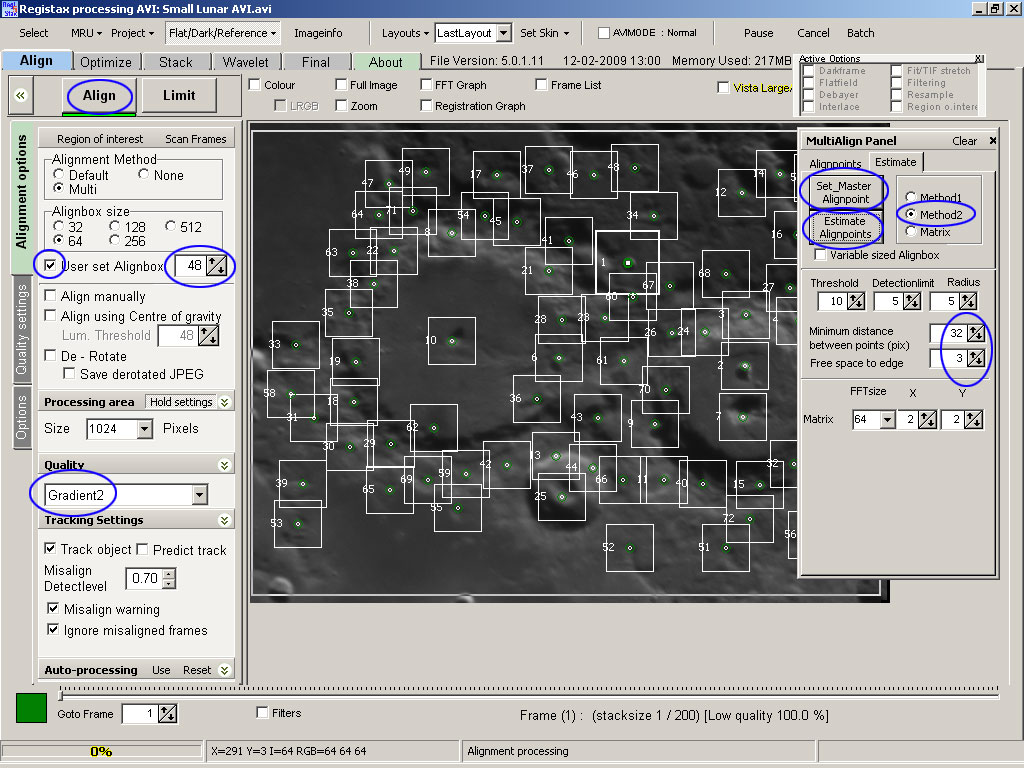
Figure 5.
Align
Frames
After
all the above, we can click on Align (figure
5). Two
significant new R5 things to
mention here:
· A new Quality assessment
method called Gradient2 is
available. The R5 testers unanimously agreed that it gave better
results and is
now the new default. I’ve run apples-to-apples comparisons and on good
AVIs it will
give slightly more detail. Amazing!
· Align processing is now significantly faster.
R4 would read all frames
to align AP1, next read all frames to align AP2, etc. In R5, as each
frame is
read, all APs are quality assessed and an initial estimate of alignment
determined. This is significantly faster (and much easier on the hard
driveJ).
Project Save
Prior to R4, it was possible to save Registax status at various stages in processing and reload it at a later time. This was no longer possible in R4. Now in R5 after aligning (and after optimizing) it is possible to save the status. This works quickly and well. I typically do it in order to protect myself against any failures in later steps (very rare) or even power outages. It is then a simple matter to reload and restart the process from that point. Highly recommended! Click on Project and then click on Save Default.
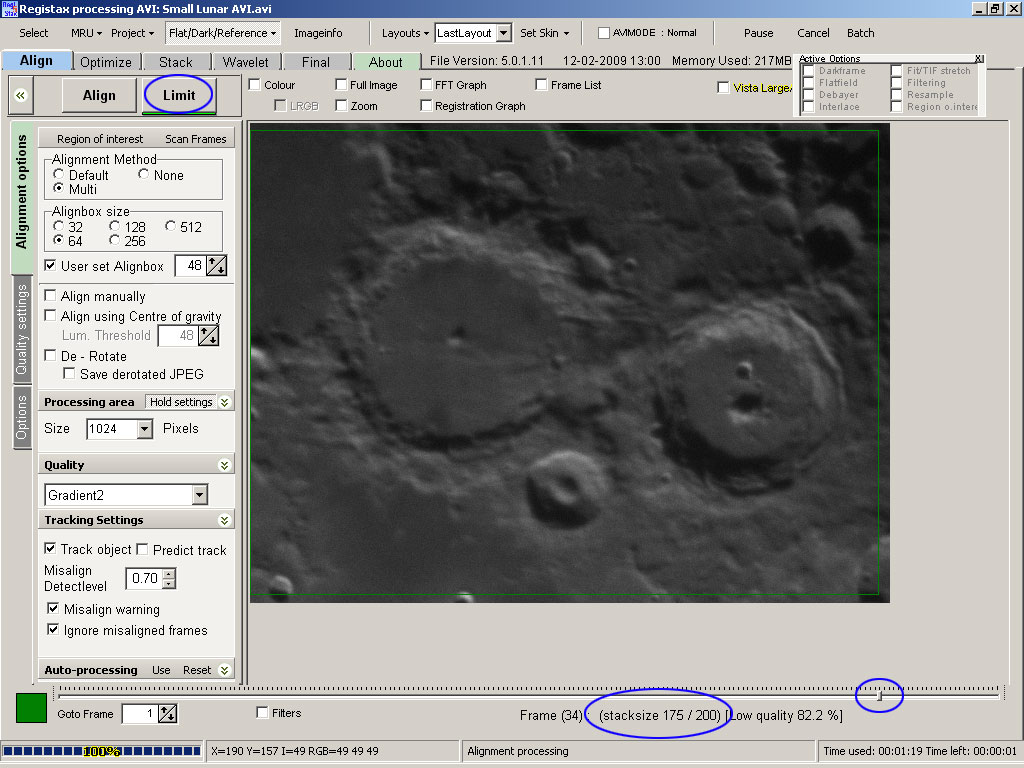
Limit Frames (figure 6)
After initial alignment completes, I use the slider at the bottom of the screen to specify the number of frames carried forward into subsequent steps. In this example, 175 are specified. To be clear this means the 175 best frames for each AP will be used. The number of frames needed depends on how many need to be stacked together to reduce noise to an acceptable amount. For my cameras and sharpening workflow, a value of 450 is usually enough. After moving the slider, click on Limit.