
Setting Alignpoints
In RegiStax V4 the user allready had several ways to set Alignpoints. In RegiStax V5 we have extended the options for the user. There are 3 groups of setting alignpoints, by hand, let RegiStax estimate them or a mix of both. In the text below you can see more about this.
- Setting Alignpoints by hand
- Let RegiStax estimate Alignpoints
- A mix of both
 Preparations
The image to the right shows the Align options area at startup. Before you set alignpoints you need to decide to either go with the default (1 alignpoint) or use multi (many alignpoints) or no alignpoints at all.
Before you start setting alignpoints, select a good frame that looks better than average. If you have a large amount of drifting dont select a frame that is too far into the set of frames as this might give problems during the start of aligment. In RegiStax V4 the referenceframe was allways the frame the user had located in the sequence of images to position the alignpoints on. In RegiStax V5 we allow the user to load a referenceframe which serves two purposes, first off all it allows the user to find the best alignpoints better (for instance using the estimate-alignpoints function) and secondly it can be a far better reference for the topology of the image.
When using the default method, the user can only set one alignpoint. The user also needs to set the alignboxsize (the area used to estimate quality and estimate the alignment). The last used alignboxsize will be default at startup. If the "User set Alignbox" is checkmarked the size of the alignbox set by the user will be used. The user will see -when positioning an alignpoint - a double box in this case. The outerbox is the nearest default alignboxsize, thats the area that will be used for image-quality estimation and the inner alignbox is the area that will be used for alignment. This allows the user to use small alignboxes that align properly but also will estimate image-quality based on a good amount of pixels. Most other features are merely usefull in multi-point alignment. The examples below are therefore aimed at explaining the ways to set multipoints.
1. Setting Alignpoints by hand
This is the method we allready had at hand in previous versions. The user selects Multi in the alignmentmethod box and a multi-alignpanel pops up.
This panel will show the alignpoints and allows the user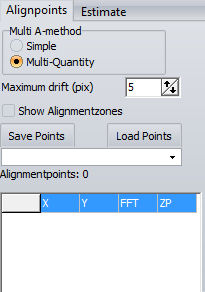 to load alignpoints and save them also for later usage. A new feature
is the maximum-drift setting. This is very usefull in
multipoint-alignment. If any of the alignpoints drifts away more then
the user-set amount of pixels (relative to alignpoint# 1) it will be
restricted to the shift of alignpoint #1. We refer to Alignpoint
#1 as the Master-Alignpoint. Below the save/load point buttons a new
control is visible. When openend (use the arrowbutton on the rightside)
it will show the available saved sets of alignmentpoints that have the
same name as the file that is being processing. So if you work on an
AVI called MOON.avi and save your alignpoints with names like
MOON100points or MOON4x64 Registax will show those alignmentpoint-files
since they have MOON in their name. Everything else is much as before.
Now the user can set points by hand, simply set the alignbo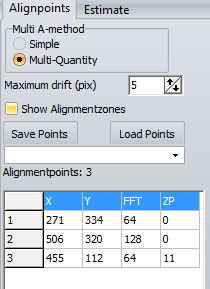 xsize
and position a point at a location that looks rich in contrast. After
setting a point the panel shows the X,Y position and the size of the
alignbox (FFT). The user can set many boxes of the same size but also
can mix them, just select another alignboxsize and position the
larger/smaller boxes. Its often wise to make sure that the
master-alignpoint (#1) is located at the richest area in terms of
contrast. Also the alignbox of the master-alignpoint should not be
small, 64x64 is the smallest usefull for this point. The
user can also use the User-set alignbox sizes mixed. In the image to
the right you can see we set alignpoint 1 using a 64x64 box, alignpoint
2 has a 128x128 alignbox and alignpoint 3 has something special. The
alignbox for alignpoint 3 is 64x64 in size but it also has a ZP
(zeropadding) value of 11. This means that on all sides of this
alignbox 11 pixels will not be used during alignment. The alignbox is
therefor 64x64 for quality estimation and 42x42 for alignment. Smaller
alignmentboxes are considered better to align on finer details. When
you use a lot of user-set alignpoints its wise to record them, when
saving them (save points) be aware that RegiStax also saves the number
of reference-frame you have been using to position. So if you load the
points again they will be at the same location and on the same
imageframe.
2. Let RegiStax estimate Alignpoints
In RegiStax V4 we had a way to estimate alignpoints, the method uses was however not very powerfull. In RegiStax V5 you will see things are a lot better.
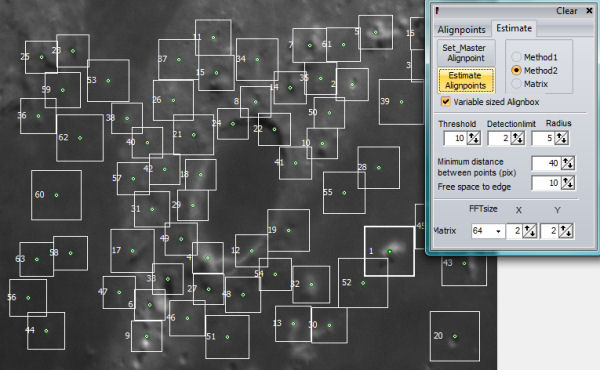
To estimate alignpoints you need to select the ESTIMATE tab in the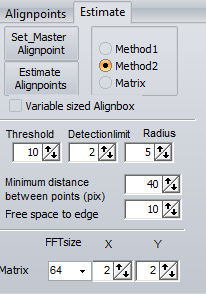 multi-alignmentpanel (next to alignpoints).
When pressed you see the panel to the right. There are many controls
you can use and most of them are recorded, so next time you dont need
to set them again ! Starting from the top we have the button "SET
MASTER ALIGNPOINT" .When pressed the user can position a
master-alignpoint based on the size of the alignbox or user-set
alignbox. This point will alignpoint #1 and when you estimate the other
points they will not overwrite this point and also keep their distance.
Next control is the Method, we have method1, method2 and matrix. The
matrix will setup a set of alignboxes arranged as a matrix, the user
can set both the number (X,Y) and the size of the alignboxes. The
default X,Y of 2 will setup a scheme of 2 x 2 = 4 alignboxes all 64x64
pixels large. This can sometimes be usefull. But most of the time we
will be using method 1 or 2, they work slightly different and the user
has to find out what works best for the user's images. The method uses
the threshold, detectionlimit, radius to calculate possible
alignpoints. Increasing the threshold (range 2-15) or detectionlimit
will lower the number of alignpoints. The detectionlimit will block
setting alignpoints on pixels with an intensity lower than the
detectionlimit. The radius calculates the alignpoint strength based on
an area around the pixel. A larger area will create less alignpoints.
The minimum distance and free space to edge control how close
alignpoints are allowed to be near to each other. When calculating the
best alignpoints RegiStax orders the points on strenght and then works
from the strongest to the weakes found alignpoint. If the next
alignpoint-candidate is too close to either the edge of another
(stronger) alignpoint it will be neglected. Finally we also have
"variable sized alignbox". In this mode RegiStax will mix alignbox
sizes to create a scheme with minimal overlap between alignboxes. WHen
you are not happy with the estimates, simply change the settings and
press estiimate again.
This example shows how the schem looks when not using variable sized alignboxes. Notice that alignbox1 is highlighted.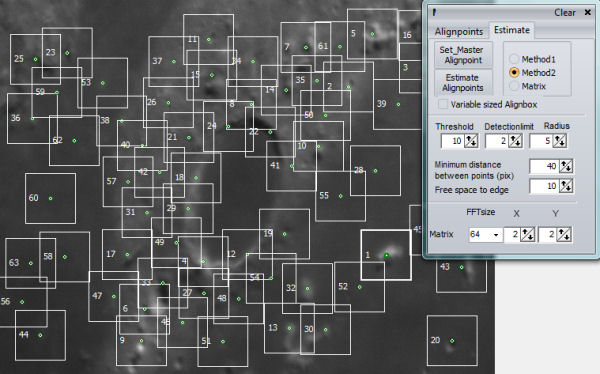
This example shows how the schem looks when using variable sized alignboxes. The overlap between boxes is minimal this way. In large smooth areas few alignboxes appear and near to rich areas many boxes appear.
3. A mix of both
A user can simply first set a group of alignboxes/points using the estimate method and then still add several points by hand or remove points. Adding them is like we are used to and they are based on the alignboxsize set or the user-set alignboxsize. To remove an alignbox you have to double-click using the RIGHT-MOUSE button.
A user can simply first set a group of alignboxes/points using the estimate method and then still add several points by hand or remove points. Adding them is like we are used to and they are based on the alignboxsize set or the user-set alignboxsize. To remove an alignbox you have to double-click using the RIGHT-MOUSE button.