

The image above shows the general functions available on the Alignpage. The 3 buttons on the left are connected to the 3 steps of alignment. After loading a set of images the "Set alignpoints" button will become available, after setting alignpoints the "Alignbutton" will become available and after alignment the "Limit" function will become availble. All the other checkboxes are used to show information before or after alignment.
After loading your images Alignment can be started. The alignment-process is divided into 3 steps:
- Set Alignpoints
- Align
- Limit the number of frames to be stacked
 1)
Set Alignpoints
1)
Set AlignpointsR6 allows you to set alignpoints both manually or using the "Set Alignpoints" button, you can also mix these methods. Manual setting of Alignpoints is simple, you press the left-mousebutton on a location where you want an Alignpoint and it will be set at that point. Using the right-mousebutton you can remove the nearestby alignpoint.
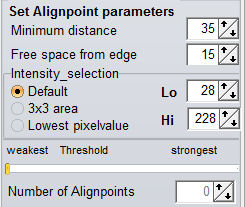
I suggest using the "Set Alignpoints" button in most cases, this will generate a set of alignpoints ordered in "strength". Stronger alignpoints will most likely align easier than weak alignpoints. The alignpoints are selected based on the settings for minimum-distance, free space from the edge and the image intensity around a possible alignpoint. The selection based on intensity around the alignpoint can be done in 3 ways. Default means an area of 48x48 pixels around a possible alignpoint is used to estimate the image intensity, using 3x3 the average is calculated on very few pixels and using lowest pixel will select on the lowest pixelintensity in a 48x48 pixelarea. An alignpoint will only be generated if the intensity is between the LO-HI intensity settings.
TIP:When large black or almost black areas (often with planets) exist in an image using the 3x3/lowest pixelvalue method is preferred to prevent setting of alignpoints in dark areas. Alignpoints should ideally be positioned inside areas that are not too dark and with a good amount of contrast.
After "set alignpoints" you can reduce the number of alignpoints by moving the threshold slider from left to right. This will keep the "strongest" alignpoints for alignment and disable the weaker alignpoints. The thresholdslider remembers its position, if you however set the threshold at the weakest position that will not be recorded to prevent the default usage of very weak alignpoints. If you have decided which alignpoints you want to use and you think some areas still lack alignpoints this is the right time to add alignpoints manually. They will be added at the bottom of the list of alignpoints.
NOTE:When you press "Set alignpoints" again your manual placed points will be lost !
EXAMPLE: SET ALIGNPOINTS
 2) Alignment
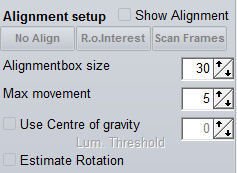
Before you start the actual Alignment you can set several alignment parameters. During the setting of alignpoints we havent decided how large each alignmentbox is. In V5 this was a major part of the alignment-process and we were using different sized alignboxes. In V6 this is not the case. The default alignmentbox is 30 pixels, this might feel small compared to the settings in V5 but this seems to be a good setting for the new alignmethods. You can always change this off course, and that setting will be your default from that moment on.
The Max movement setting is used to make sure that no alignpoint suddenly starts to move away from the other alignpoints. The default of 5 means that no alignpoint can move more than 5 pixels in X or Y direction (compared to the other alignpoints). If an alignpoint does move more than the set value its alignment will be set to the average movement of the other alignpoints.
Use Centre of gravity has the same functionality as in R5, during alignment the Centre of Gravity will be calculated as an initial guess and then the normal alignment will be calculated. The Lum-threshold for Centre of Gravity is as in R5.
Estimate rotation will only use 2 alignpoints during alignment, you can set more alignpoints but only alignpoint 1 and 2 will be used to estimate rotation and during stacking.
Buttons
NO ALIGN
WHen you press this button NO alignment will be performed and you will be directly moving to the stackingstage. This can be used to stack images without alignment, for instance to create darkframes/flatfields.
R.O.Interest
This allows you to set a Region of Interest, after pressing the button a yellow box will appear on the screen. You can move and resize this box to position it on the area you want to keep for stacking. If you press "Set alignpoints" after setting the ROI the alignpoints will only be set inside the ROI. When the ROI is visible you cannot set alignpoints manually inside the ROI. To do this first uncheck "show ROI". The set ROI will be kept but will not be visible. Pressing the R.O.Interest button once more will disable the ROI.
Scanframes
This allows you to run a fast alignment using up to 5 alignpoints (based on the alignpoints available). After alignment is done you will be shown the area (yellow box) which is available on all frames. RegiStax will also automatically generate alignpoints inside this area.
After all parameters are set you can press the ALIGN button to start Alignment.
EXAMPLES: -SCANFRAMES
3) Limit
After alignment you w
3) Limit
After alignment you w -ALIGN
3) Limit
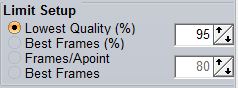
After alignment you will need to decide how many frames you want to keep for stacking. In RegiStax 6 there are 2 methods to do this and you can use both those methods in a relative (%) or absolute manner. Lowest quality and Frames/Apoint will select a number of frames for each alignpoint. If for instance 100 frames (frames/Apoint) are selected this means that for each alignpoint the best 100 frames (based on quality) will be selected, the total amount of frames selected (after pressing LIMIT) will be larger than 100. When using many alignpoints the amount of frames selected to be stacked can be a lot larger than the setting.
When using the Best Frames (% or number) option only "full"frames will be selected. So selecting 100 will only use the 100 frames that have - for all the alignpoints - the best overall imagequality. The position of the slider below the image after alignment is based on the setting of the Limit-Setup.
 Lowest
Quality % and Best frames % will set the position of the slider to the
image with at least a quality of X % compared to the best image. In
this example a setting of 95% means that probably only a few frames
will be selected. When using the number (80 in this example) as a
selector the slider will be set to this amount of frames or less if
your sequence has less frames available.
Lowest
Quality % and Best frames % will set the position of the slider to the
image with at least a quality of X % compared to the best image. In
this example a setting of 95% means that probably only a few frames
will be selected. When using the number (80 in this example) as a
selector the slider will be set to this amount of frames or less if
your sequence has less frames available.Although the slider is set to a position after alignment this should not stop you inspecting the images or changing its position. If you decide that you want to use more/less frames simply position the slider to the last image you want to use (for best frames) or to the amount of frames you want to use (for lowest quality and frames/apoint) for each alignpoint. You can also change - based on the limit method choosen - the % or number of frames using the controls in the Limit setup, changing these will move the slider.
After setting the slider to the number of frames you want to use you can Press the LIMIT button, that will select the frames and move you to the next stage: Stacking.